Tutorial 12: Kristen Bell - Header
Tutorial #12: Krissten Bell - Header
We're making this:
-Photoshop CS2
-Medium
-Image Heavy
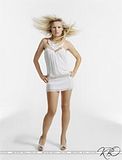
01. I chose two Kristen pics from KB Online:
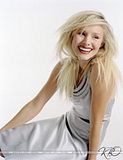
//
I opened a new canvas {File-->New}, 600x400 pixels in size. I copy and pasted the two pictures on there, and then blended them together using the Polygonal Lasso Tool [
]. I'm not going to go in a huge indepth tutorial on blending, because I'll confuse you, there are heaps of good tuts out there for that :)
I then merged {Layers-->Merge All} everything and sharpened {Filter-->Sharpen-->Sharpen} once. Which gives us our "base"
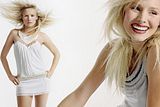
02. Duplicate {Layer-->Duplicate Layer} your base layer twice. Set both copies to Soft Light, leave both the opacities at 100%, then desaturate {Image-->Adjustments-->Desaturate} the top layer:
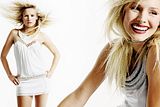
03. Create a new layer {Layer-->Newb-->Layer}. Fill it with a dark blue colour (#113067), set the blend mode to Exclusion, have the opacity between 90-100%:

04. Another new layer, fill with a sky-blue colour (#bce6f2). Set to Colour Burn, opacity at 100%:

05. New layer, fill with a yellow-orange color (#ffd991). Set it to Soft Light, have the opacity between 90-100%:

05. Another new layer, fill it with a pinkish colour (#fc9191). Set it to Soft Light, leave the opacity at 100%:

06. Create one last new layer and fill it with another yellow-orange colour (#f8dc9e). Set it to Multiply and have the opacity between 30-40%:

07. Go right back to the bottom of all your layers and duplicate the desaturated soft light pic of Kristen. Drag it to the top and leave it exactly as it is:

08. Now we play with Curves. Not all setting will work on all pics, play around, I'll tell you the settings I used though. Go Layer-->New Adjustment Layer-->Curves. A box will pop up, just click 'OK'. Click anywhere on the graph, and then where it says Input and Output you'll be able to type numbers. Also, up the top there's a drop down menu, you can change the RGB option. Here are my settings:
RGB:
Input: 129
Output: 126
Red:
Input: 114
Output: 125
Green:
Input: 124
Output: 133
Blue:
Input: 118
Output: 137
Then just click 'OK'. I'm soo sorry if I've confused you with my explanation.
09. Now we're going to play with the Colour Balance, live curves this won't work with all images. Go Layers-->New Adjustment Layer-->Colour Balance. When the box pops open you'll see an option that says 'Colour' select yellow. Now click 'OK'
In the boxes type: -15, -11, +14:
After all that our header is starting to look pretty good!

10. For the text I wrote 'KRISTEN BELL'
Font: Print Dashed
Anti-Alias: Sharp
Size: 80pt
Colour: #c57676
'So Beautiful'
Font: CAC Pinafore
Anti-Alias: Sharp
Size: 24pt
Colour: #c57676
I also rotated both pieces of text using Ctrl + T:
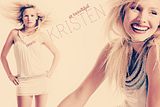
11. Finally I added this brush thingy by gender. I copy and pasted it onto the image, and then set it Multiply, with the opacity at 100%. I moved it aroumd ect until it looked right, and we're done!

I hope I didn't confuse you and that it managed to help somebody out there! You can copy the tut and take the header aslong as you credit __iiconize__ or lozzy_babe06.
I also made these icons following the same thing:




Thanks!
Lozzyxx
We're making this:

-Photoshop CS2
-Medium
-Image Heavy
01. I chose two Kristen pics from KB Online:

//

I opened a new canvas {File-->New}, 600x400 pixels in size. I copy and pasted the two pictures on there, and then blended them together using the Polygonal Lasso Tool [

]. I'm not going to go in a huge indepth tutorial on blending, because I'll confuse you, there are heaps of good tuts out there for that :)
I then merged {Layers-->Merge All} everything and sharpened {Filter-->Sharpen-->Sharpen} once. Which gives us our "base"

02. Duplicate {Layer-->Duplicate Layer} your base layer twice. Set both copies to Soft Light, leave both the opacities at 100%, then desaturate {Image-->Adjustments-->Desaturate} the top layer:

03. Create a new layer {Layer-->Newb-->Layer}. Fill it with a dark blue colour (#113067), set the blend mode to Exclusion, have the opacity between 90-100%:

04. Another new layer, fill with a sky-blue colour (#bce6f2). Set to Colour Burn, opacity at 100%:

05. New layer, fill with a yellow-orange color (#ffd991). Set it to Soft Light, have the opacity between 90-100%:

05. Another new layer, fill it with a pinkish colour (#fc9191). Set it to Soft Light, leave the opacity at 100%:

06. Create one last new layer and fill it with another yellow-orange colour (#f8dc9e). Set it to Multiply and have the opacity between 30-40%:

07. Go right back to the bottom of all your layers and duplicate the desaturated soft light pic of Kristen. Drag it to the top and leave it exactly as it is:

08. Now we play with Curves. Not all setting will work on all pics, play around, I'll tell you the settings I used though. Go Layer-->New Adjustment Layer-->Curves. A box will pop up, just click 'OK'. Click anywhere on the graph, and then where it says Input and Output you'll be able to type numbers. Also, up the top there's a drop down menu, you can change the RGB option. Here are my settings:
RGB:
Input: 129
Output: 126
Red:
Input: 114
Output: 125
Green:
Input: 124
Output: 133
Blue:
Input: 118
Output: 137
Then just click 'OK'. I'm soo sorry if I've confused you with my explanation.
09. Now we're going to play with the Colour Balance, live curves this won't work with all images. Go Layers-->New Adjustment Layer-->Colour Balance. When the box pops open you'll see an option that says 'Colour' select yellow. Now click 'OK'
In the boxes type: -15, -11, +14:
After all that our header is starting to look pretty good!

10. For the text I wrote 'KRISTEN BELL'
Font: Print Dashed
Anti-Alias: Sharp
Size: 80pt
Colour: #c57676
'So Beautiful'
Font: CAC Pinafore
Anti-Alias: Sharp
Size: 24pt
Colour: #c57676
I also rotated both pieces of text using Ctrl + T:

11. Finally I added this brush thingy by gender. I copy and pasted it onto the image, and then set it Multiply, with the opacity at 100%. I moved it aroumd ect until it looked right, and we're done!

I hope I didn't confuse you and that it managed to help somebody out there! You can copy the tut and take the header aslong as you credit __iiconize__ or lozzy_babe06.
I also made these icons following the same thing:


Thanks!
Lozzyxx