tutorial three
Very simple tutorial for enhancing black and white images, done in PSP8.
From this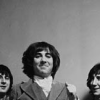
to this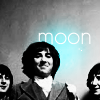
.
This is basically just a guide, very easily altered to fit the photo you're working with.
1.
Crop base. Don't sharpen. If your base isn't already black and white, desaturate, or make a new layer in white and set to colour.
2.
Duplicate base and set to overlay.
3.
Duplicate base and set to overlay.
4. Select the brush tool and make a roughly oval shape. I used #2FF3FF. You'll probably want to blur the dot a bit, so go to Effects>Blur>Gaussian Blur and set the radius to around 8.
5. Set the dot to overlay, and place it somewhere where it looks good and accents a part of the image, not just somewhere random.
6. I erased the part of the dot that was on Keith's face.
7. Added text in GeoSansLight, size 20.
8.
Fin.
The most important thing about the tutorial is that it can be altered to suit most images. If it's too dark, add a duplicate of the base on screen, under the overlay layers. Too contrasty? Delete one of the overlay layers. Play around. Have fun.