.006 TUTORIAL emma watson
This tutorial was requested by amortentia_gal
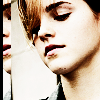
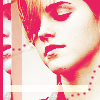
We are going from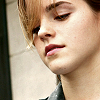
to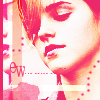
using PSP9.
*This is from my base set that I posted a little while ago.
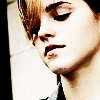
Step 01.
.\ Open your base. I have made quite a few bases here if you want to check it out ;)
.\ Duplicate the base, set it to soft light / 76%. Go to Adjust> Brightness & Contrast> Brightness & Contrast (Shift+B) Set it to 98 for the Brightness and 23 for the Contrast. Trust me on this ^-^
.\ Duplicate the original base, not with the B&C, and set it to soft light / 100%
.\ Duplicate again, set to screen / 26%. Mess around with the Brightness & Contrast again, until you like it.
.\ Duplicate once again. Desaturate (Black & White), Soft Light / 47%. Then duplicate THIS layer (B&W one) and leave all the settings the same. You can change the Brightness and Contrast again.
.\ Merge visible. This is what it should look like:
Step 02.
.\ Take your selection tool and take a part of Emma's face (copied of course) and drag it to one side. Then Desaturate it. Example.
.\ Pick a bright color. I picked Hot Pink (#E7205F). Flood Fill onto a new layer and set it to Lighten / 100%.
.\ This part I got from princessginny78's tutorial. Select a certain area, should be verticle, pick a color (#FB7A4D), fill in the rectangle, set it to multiply / 34%.
.\ Then select a thinner horizontal rectangle, pick a color (#FB7A4D), set it to screen / 100%. Duplicate the screened layer twice. Leave all settings the same. This is what I have so far:
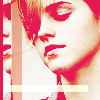
Step 03.
.\ Now we are going to do the dotted lines. Pick a color from your picture (preferrably a darker one). I picked #E7205F. Go to your default circle brush, (Size 3; Hardness 25; Step 200; Opacity 100) and drag it to where you want the dots to go. Example.
.\ Then take this brush by The Magic Box, in the same color as the dots, slap it down by the bottom. So far...

Step 04.
.\ Time for text. Add a new layer, in the same color as the dots & brush, I wrote "ew" (for Emma Watson) in Pharmacy; size 12. I moved to "w" lower and over towards the "e" more. then I just put some tiny text there and your done!
I hope this was helpful to you and I would love to see what you guys came up with!
We are going from
to
using PSP9.
*This is from my base set that I posted a little while ago.
Step 01.
.\ Open your base. I have made quite a few bases here if you want to check it out ;)
.\ Duplicate the base, set it to soft light / 76%. Go to Adjust> Brightness & Contrast> Brightness & Contrast (Shift+B) Set it to 98 for the Brightness and 23 for the Contrast. Trust me on this ^-^
.\ Duplicate the original base, not with the B&C, and set it to soft light / 100%
.\ Duplicate again, set to screen / 26%. Mess around with the Brightness & Contrast again, until you like it.
.\ Duplicate once again. Desaturate (Black & White), Soft Light / 47%. Then duplicate THIS layer (B&W one) and leave all the settings the same. You can change the Brightness and Contrast again.
.\ Merge visible. This is what it should look like:
Step 02.
.\ Take your selection tool and take a part of Emma's face (copied of course) and drag it to one side. Then Desaturate it. Example.
.\ Pick a bright color. I picked Hot Pink (#E7205F). Flood Fill onto a new layer and set it to Lighten / 100%.
.\ This part I got from princessginny78's tutorial. Select a certain area, should be verticle, pick a color (#FB7A4D), fill in the rectangle, set it to multiply / 34%.
.\ Then select a thinner horizontal rectangle, pick a color (#FB7A4D), set it to screen / 100%. Duplicate the screened layer twice. Leave all settings the same. This is what I have so far:
Step 03.
.\ Now we are going to do the dotted lines. Pick a color from your picture (preferrably a darker one). I picked #E7205F. Go to your default circle brush, (Size 3; Hardness 25; Step 200; Opacity 100) and drag it to where you want the dots to go. Example.
.\ Then take this brush by The Magic Box, in the same color as the dots, slap it down by the bottom. So far...
Step 04.
.\ Time for text. Add a new layer, in the same color as the dots & brush, I wrote "ew" (for Emma Watson) in Pharmacy; size 12. I moved to "w" lower and over towards the "e" more. then I just put some tiny text there and your done!
I hope this was helpful to you and I would love to see what you guys came up with!